Dashing Diva Semi-Cured Gel Glaze Strips: A Comprehensive Review and Application Guide for Perfect Nails with 5-10+ Days Wear Time
My journey to long-lasting and easy-to-apply nail enhancements, starting with Dashing Diva Glaze from the Sally sale at 75% off!
Affiliate links are in this post. When you purchase through one of these links, I may earn a small commission. Thank you! The product was purchased with my own money.
For over 10 years, like pre-Jamberry, I have been on a quest to try all things nail strips and nail enhancements. Bouncing from those pre-done options to trying every nail polish and system on a journey to find an option that looks good for 7+ days.
While I've found some contenders, I love trying new things! And this is the first post documenting that journey.
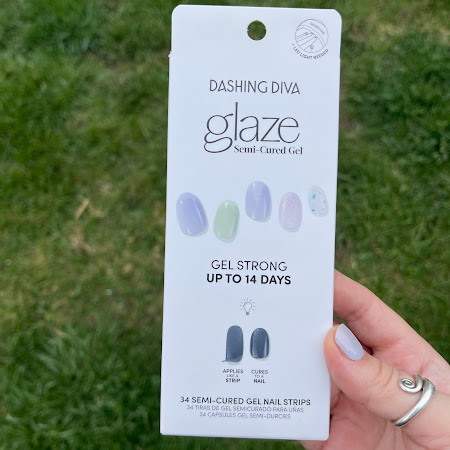
Dashing Diva Semi-Cured Gel Glaze Strips
"Get salon-quality nails at home with GLAZE. Apply the easy-to-use gel nail strips and cure with LED mini lamp in 45 seconds for full-coverage, sculpted nails. Achieve mega volume and maximum shine with real salon gel strength for up to 14 days."
Sally's clearance sale included many Dashing Diva nail and Glaze products. I was at 2 separate Sally stores a few weeks ago, and one didn't have ANY of the nail sets actually marked with stickers clearance, and we had to bring a bunch up to the register to see which ones were marked down - and we found a bunch that were secretly marked down!
The markdown was $3.59 for this design, and $2.79 for solids - this is close to 75% off! And I saw a post on FB the other day that this clearance markdown may still be going on in certain stores, likely until all the clearance stock is gone. So, you'll have to check and see if your Sally Beauty has any of the clearance sets, which, from what I can tell are no longer on the website and are old stock.
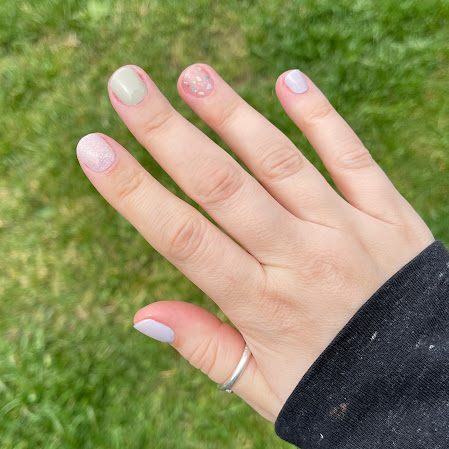
Of the clearance sets I grabbed, the design I'm wearing in this post is Lavender Field, which is a cute spring set and appropriate for Easter this weekend!
Now, I've tried Glaze before and did not love them.
Previously, I found them to be gummy and didn't fully cure to harden like I wanted them to. But that was before I learned that you really need to cure these for 3-6 60-second cycles under the lamp to get them fully hardened. And, I learned some other application tips, which I'll share below, and I made a bunch of changes in my application process that have really grown my love for these semi-cured gel strips.
The last time I applied them, I used the Base Seal for Gloss plus a gel top coat, and got a full 7 days, which is great for me and my oily nail beds, and desire to change things up after a week!
This time, I didn't use the Base Seal (just to see) but did use a top coat, and the wear time was just 5 days before lifting started. 😕
 |
| Dashing Diva Glaze in Lavender Field |
Cost:
Application Process for this set:
- Push back cuticles using cuticle remover. I used this one.
- Wash and dry hands with dish soap - no lotions or oils!
- Use included alcohol wipe on nails AND fingertips.
- OPTIONAL: Use nail dehydrator - I have oily nail beds and wanted to get a little extra dehydration to help with adhesion.
- Apply strips to each nail. Choosing ones that are ever so slightly smaller than the nail bed - so there's a sliver of a gap on the sides. This helps so you don't get any of the strip on the hidden cuticle on the sides of the nail, which helps with adhesion, longer wear, and preventing snags.
- After I apply each strip, I use a nail scissor to clip away excess. You don't have to clip it all away, just remove most of the length. We will file after curing - it's easier then.
- Using the included orange stick, apply pressure to roll down the edges of each strip and press them to the nail, making sure you're really sealing the edges, especially at the tips. Basically, you're gonna use it as a little rolling pin over the strip to really get a good seal to the nail.
- Then, once you've gotten a good seal and clipped the edges, you're going to cure under your lamp. 3-6 cycles of 60 seconds each for hand, until you can no longer dent the strip with the edge of the stick, or until they're really solid and hardened.
- After they are fully cured, file to smooth the edges and remove the rest of the excess strip.
- OPTIONAL: This is not required, but I like to swipe with alcohol again to remove the dust, then top with a gel top coat for extra protection and glossiness. It'll help cover imperfections in the application if you have any, too. This is the one I use.
 |
| Dashing Diva Glaze in Lavender Field |
Application Video:
Application Tips:
- These require a gel lamp. This is the one I have.
- Make sure you choose a strip that is slightly smaller than the full nail bed, as you don't want it to apply it too close to the skin and risk getting it on some hidden cuticle. Additionally, this will help with wrinkling at the tips and edges and adhesion to the nail.
- For the first few sets of semi-cured gels, I would just try it as directed on the package. Most people don't need extra tricks - I seem to because I have oily nail beds, but a lot of people get long wear with nothing extra! For most, semi-cured gel strips will work best when applied directly to the natural nail.
- Never apply gel strips in the sun!
- While applying strips, keep the unused strips away from the lamp or any sunlight so they don't harden prematurely.
- Do not shower, swim, bathe your kids, or do dishes after applying your strips. You want to avoid prolonged water exposure for 8-10 hours for the adhesive to cure/set fully. Washing hands should be okay, but we want to avoid soaking.
For curing:- Fully cured strips should feel like a fake nail. If you are using a mini lamp, you may need to move it around to get different angles.
- There is no fixed time for curing for every style and brand of strip. Some are thicker and require more cure time. Dark colors may need more time. Just keep doing cycles until fully hardened.
- To test if they are done, you can take a wooden orange stick and poke the strip to see if it dents. If it does, it's not fully done! You can also check by nail flexibility, if they are still bendy, they probably aren't done.
- Cure until done. If they are still denting or feeling gummy, keep curing. If they are hard, stop.
 |
| Dashing Diva Glaze in Lavender Field |
Wear Time
- For this set - the wear time was sadly just 5 days before they started lifting. I did NOT use the Base Seal mentioned below, and I wonder if they would have held the full 7 days if I had.
- Without the tip of curing them for several extra rounds, in the past, these have worn no longer than 4 days.
- The last time I applied them, I followed the application steps above, used the Base Seal for Gloss under them (from Dashing Diva), and a gel top coat (this one), and I got a full 7 days before they started lifting and I wanted to remove them.
- Next time, I will use the Base Seal for Gloss as that did seem to make a difference for me in wear time
Removal
- The strips will come off in one piece. You do not need to soak or scrape. You can add anything you want to the top, like glitter, gel topcoat, and the removal will be the same.
- To remove, you'll need either a gel strip remover like Magic Off, or a homemade mix of 50:50 cuticle oil and acetone as described above.
- You'll also need a tool to get under the strip, a simple orange wood stick will do and that comes with most gel strip brands.
- DO NOT just peel off even if you feel like you can. This can damage your nails.
- Steps for removal:
- Apply the remover all around the edges of the strips on one hand.
- Let it sit for a few minutes.
- Orange stick or other tool and get under the edges of the strips, all the way around if you can.
- If you'd like, add more remover, this time under the strip where you have lifted it from the nail. Wait a few minutes.
- Slowly work your way around with the tool, adding more remover if needed, and wiggling the strips off gently.
- Repeat on the other hand.


Comments
Post a Comment